Hubble Telescope Spots Supermassive Black Hole

 Newton’s laws and science of cosmology forfeit on the doorsteps of a black hole. In recent times, we captured the very first images of a black hole. A concept like “Supermassive Black Holes” (SMBH) is coming into the scientific domain. The Hubble Telescope has got a shadow image, which may be considered as a supermassive black hole.

What are Black Holes & SMBH?

Black Holes are the regions in space and time dimension where gravity is extremely powerful. This power does not even let the electromagnetic and light particles to escape from it. John Michell and Pierre-Simon Laplace were the first to predict black holes by considering the object’s gravitational field. The Event Horizon Telescope took pictures of the black hole and showed them the first time last year. This black hole belongs to the Messier 87 (or M87) galaxy. As the name suggests, Supermassive Black Holes have more mass, billion times than that of the Sun. Our galaxy, the Milky Way, has an SMBH in its galactical center. The characteristics of any black hole and supermassive black hole are:

  • Singularity
  • Photon sphere
  • Accretion disc
  • Event Horizon
  • Innermost stable orbit
  • Relativistic jets

What has the Hubble Telescope found?

The Hubble Telescope spotted the shadow of an SMBH’s dust ring cast into space. This SMBH is in the IC5063 galaxy. The distance of this galaxy from the Earth is 156 million light-years. A team led by Peter Maksym presented this research in a paper titled, “Crepuscular Rays from the Highly Inclined Active Galactic Nucleus in IC 5063.” Crepuscular rays are those light rays that pass from the gaps of SMBH and black holes. They give the effect of the visible beam. It seems like a twilight formation during the Sunsets. The team of the Center for Astrophysics | Harvard & Smithsonian (CfA) has presented several explanations about the existence of SMBH. The dust ring and angle of the cones of light relative to the galaxy IC5063 gave clues to the source of the rays and shadows. As per the analysis, the dust ring shadow explanation is the best one to consolidate black holes.


Why is the study critical?

Black Holes are the most challenging objects that are not easy to explore. One cannot see it from the visible eye or using the telescope. We cannot use electromagnetic radiation as it won’t help us to discover black holes. It is because of the property of the black holes that don’t let the radiation and light to escape from it. One of the solutions is to observe the stars. When the stars pass from these black holes, they attract them due to the strong gravitational field. This inward movement is called accretion. The attracted star generates heat and accelerates to emit X-Rays or powerful gamma rays into space. As a result, scientists understand the presence of a black hole due to the emission of rays. The study of black holes will somewhere help humanity to understand the birth of our Universe.


Source:-   Hubble Telescope Spots Supermassive Black Hole

How To Change Your Zoom Background

 Video conferencing has become popular these days because of the epidemic. It has played a vital role in connecting people across the globe. Students take online classes, and professionals communicate actively through Zoom software.

Therefore, it is essential to create a customized video room for a seamless experience. To get an ultimate calling experience, you will need to change your Zoom background. It is an excellent idea if you don’t want to share your personal space with your office colleagues, friends, online tutors, and more. You can set your Zoom background to whatever you want to show, like your favorite beaches, monuments, pictures, etc.


Create a new Zoom background on your computer before joining a meeting    

If you are a desktop user, you need to follow all these steps to change your Zoom background. The first task for you is to open the Zoom app.

  • Go to your profile located at the top right corner of the app’s interface. Then find Settings and open it.
  • As Settings open, you need to click on Virtual Background.
  • When you click on Virtual Background, you will see some default backgrounds. These backgrounds can be pictures of outer spaces or blades of grass. If you like one, click on it to make your Zoom background.
  • If you want to create your desired background, you can use the photo you want to show in the Zoom background. To do so, stay on the same interface. Here you will also see a plus (+) icon. You have to click on the plus icon, and you will get a pop-up window to upload a different photo from your computer files. Select the one you want to use as a Zoom background, and you are all set. 
  • If you want to remove any photo you uploaded, click on the icon located at the top left corner. 

   Create a new Zoom background on your computer after joining a meeting    

If you have forgotten to change your Zoom background and started the meeting, don’t worry. Still, you can change it.

  • To do so, you have to stop the video for a while and go to the bottom of the app’s interface and click the up arrow. 
  • Now you have to click on the option “Change Virtual Background.” 
  • When the Virtual Background tab opens, you get options to set the default photos or the uploaded ones as Zoom background. 
  • If you are using a green screen set up, you get an option for this. 
  • If you want to add your image or video, go through the plus icon. 

Change your Zoom background on the mobile app

If you are a smartphone user, you can change your Zoom background. Download the app from app stores and create an account with it. 

  • Access the app and click on join a meeting.
  • You will see three dots at the bottom right corner of the interface. Click on it to unfold more options.
  • Select Virtual Background.
  • Upload or select the default photos to change your Zoom background.

By following these easy steps, you can change the Zoom background on both mobile and desktop.


Source:-   How To Change Your Zoom Background

Here is How to Uninstall Cortana

 Technological inventions like artificial intelligence are making our lives more comfortable. AI has completely changed the world by turning dreams into reality. And smart bots are one of the great gifts of artificial intelligence. That is why these bots are also known as smart assistants. Developers have integrated these smart assistants into different devices, including smartphones, security cameras, etc. They are voice assistants that follow your voice command to perform smart activities. They also come with dedicated devices like Amazon Echo. 

Microsoft’s Cortana is a fantastic example of these smart assistants. Cortana comes with Windows operating systems as an inbuilt software that can’t be removed easily. Many people want to disable or uninstall Cortana because of privacy concerns.


Furthermore, completely removing or uninstalling Cortana is risky as it is an in-built application from Microsoft. Also, there is no official help from Microsoft for uninstalling Cortana completely. Moreover, in this post, you will learn some safest ways to disable and uninstall Cortana. 

Disable Cortana in Windows 10

Firstly, you have to try to disable Cortana. If your PC has Windows 10 installed, you can disable it through the Windows registry. Do not hurry in the process. Follow the steps carefully:

  • Hit Start from at the menu button and type regedit in the search bar. Once you locate the regedit, click over it and choose the “Registry Editor.” Then locate the option “Run as administrator” and click on it.  
  • Now you have to find the Microsoft directory. Open it and locate the Windows directory. 
  • Make a right-click on the Windows directory and choose New>Key, name it as Windows Search. 
  • In this step, make a right-click on the new folder and select New>DWORD; you can name it AllowCortana and set the value data 0. 
  • The final step to disable Cortana is to restart the system.

Disable Cortana in Windows 10 Pro

If your computer has Windows 10 Pro installed, you can disable Cortana without making changes in the registry.

  • Go to the Start search bar and type gpedit. msc and open the option “Group Policy Editor.”
  • Navigate to Local Computer Policy, click on Computer Configuration, and select. Now, select Administrative Templates, go to Windows Components and choose Search.
  • Now, you can disable Cortana.

Process to uninstall Cortana

Do you know you can uninstall Cortana with PowerShell? PowerShell will help you uninstall Cortana on your computer. Follow the below steps to uninstall Cortana: 

  • Go to the Start menu of your PC, type PowerShell, and hit enter. Select Windows PowerShell from search results. Then find the Run as Administrator option and click on it. When the new window opens, follow the next step. 
  • Type the following text (minus the ‘ marks) in: ‘Get-AppxPackage -allusers Microsoft.549981C3F5F10 | Remove-AppxPackage’.
  • Then hit enter. 

Fantastic Beasts 3: Recasting of Grindelwald

 After Johnny Depp resigned from the team Fantastic Beasts 3, it is uncertain which actor is taking on Harry Potter’s villain Gellert Grindelwald.

Warner Bros. asked Depp to leave the film franchise as he lost the case against his ex-wife and was referred to as “wife-beater.” In the first movie of Fantastic Beasts, Grindelwald was played by Colin Farrell. At the end of the first film, the plot revealed that Percival Graves. After that, Depp played the character. In the movie Fantastic Beasts: The Crimes of Grindelwald, the storyline gave the actor a promising plot for the character, and Deppy was hired for the upcoming projects of the franchise. Hence Warner Bros. will recast the character of Grindelwald for Fantastic Beasts 3.

Farrell was a perfect choice for the character, but unfortunately, he can not be a part of his commitments with The Batman. In this article, we would try to make a list of actors who can replace Depp as Grindelwald.


Nikolaj Coster-Waldau

Nikolaj Coster-Waldau is a Danish producer, screenwriter, and actor. He is known for his famous character as Jamie Lannister in the HBO fantasy series Game of Thrones. The actor also received the nomination for Primetime Emmy Award for Outstanding Supporting Actor in a Drama Series.

Gellert Grindelwald is a different type of villain. He is as powerful as Lord Voldemort but much pleasant. Grindelwald is charismatic and charming. The actor who would play the character should be convincing enough to showcase the side and maintain his villainous nature. And the kind of thing has already been proved by Nikolaj Coster-Waldau as Jamie Lannister.

Jamie’s character was one of the most complex characters; it started as a villain, portrait as a hero, and sometimes dwelling between hero and villain. He is the character who was capable of making the fans love him and also hate him.

Coster-Waldau would add something significant to the character. The actor is also good looking and charming with his increasing acting capabilities.

Mads Mikkelsen

Mads Mikkelsen is also a Danish actor. He is known for his role as Tony in the first two films of the Pusher film trilogy, Svend in The Green Butchers, Niels in Open Hearts, Jacob Petersen in After the Wedding, Niels in Open Hearts, and Detective Sergeant Allan Fischer in the television series Rejseholdet.

The actor got worldwide recognition for playing the antagonist Le Chiffre in the twenty-first James Bond film, Casino Royale. He has shown all abilities to play the character Gellert Grindelwald. It is not sure whether Mikkelson has been approached by Warner Bros. or not, but he is undoubtedly one of the capable candidates for the role.

The Danish actor won the Cannes Film Festival Best Actor Award for Lucas’s performance in the film The Hunt. He also featured as Kaecilius in Marvel’s Doctor Strange. Mikkelson has proved that he can handle large-scale blockbusters, and his talent was not appropriately used in Doctor Strange.

Alexander SkarsgÄrd

Alexander SkarsgĂ„rd is a Swedish actor, best known for his character as Brad “Iceman” Colbert in the miniseries Generation Kill, Perry Wright in the television series Big Little Lies, and Eric Northman in the television series True Blood. The actor has won many awards, including a Golden Globe Award, a Primetime Emmy Award, and a Screen Actors Guild Award.

The actor is another excellent replacement of Johnny Depp for the role of Grindelwald in Fantastic Beasts 3. SkarsgĂ„rd can quickly flip from sympathetic to terrifying to charismatic. His performance in Big Little Lies as an abusive husband, Perry Wright, is the best example of Grindelwald’s character. Under the cover of Celeste’s pleasant and attractive partner, he played the role of a raging and vile monster.

The above are few actors who could make an excellent replacement for Depp for Grindelwald in the upcoming movie Fantastic Beasts 3.


Source:-   Fantastic Beasts 3: Recasting of Grindelwald

Eluktronics Introduces World’s First 1440 QHD 165Hz Gaming Laptops

 With the advancement of technology, the gaming experience will change and see more upgradation. And, due to organizations like Eluktronics, one can say that sky’s the limit. Eluktronics has announced the world’s first 1440p QHD 165Hz gaming laptop. It is like the thrill that Jack Sparrow brings in the movie-series of “Pirates of the Caribbean.” This game-changer product will expand the quality of gaming.

What is 1440p QHD 165Hz?

1440p represents the resolution of the video display. A 1440p screen means that the vertical resolution is 1440 pixels. It depicts that it has double the resolution of 720p and more than one-third the resolution to 1080p. A 1440p is known as QHD (Quad High Definition) with a 2560 x 1440 pixel resolution. QHD screens are meant to be sharper than Full High-Definition (FHD) with a 1080p resolution. But, they (QHD) consume or withdraw more power than FHD screens.

News about Laptop

Eluktronics announced the launch of 1440 QHD 165 Hz gaming laptops. They are available in two variants – 15 inches and 17 inches. The screen refresh rate of these laptops is 165 Hz. A combination of such a resolution and high screen refresh rate will enhance the game’s micro-detailing by assisting its graphics and animation. But, this can amplify if there’s the finest quality of screen material used in the laptops. There is no information available related to the screen material for the new Eluktronics’ gaming laptops.

Technical Specifications

  • Intel i7-10870H CPU with liquid metal
  • NVIDIA GeForce RTX 2070 Super
  • 1TB PCIe + 16GB DDR4 RAM
  • Mechanical per-key RGB keyboard
  • 94WHr battery/ 91WHr battery
  • Eluktronics 2021 Gaming Bundle

Processor & Graphics Card

Eluktronics gaming laptops embed the Intel i7-10870H CPU processor. Built on 14 nm technology, the processor is an octa core, i.e., eight cores and sixteen threads. More threads in a processor helps to execute any process faster. A processor base frequency of 2.2 GHz and a max turbo frequency of 5.5 GHz ensures better graphics operation running in a program. The gaming laptop has NVIDIA GeForce RTX 2070 Super graphics card. It delivers six times faster performance than its precedents. Dedicated hardware provides real-time ray tracing to give a more realistic and classy touch to the game. It focuses more on the reflections, refractions, and shadows, along with global illumination.

Memory, Battery & RAM

The 1440p QHD 165Hz gaming laptop comes with a 1TB PCIe memory. A PCIe (peripheral component interconnect express) is like an interface for high-speed data transfer. The high volume of memory helps to render smooth animation due to this data transfer rate. For the two variants, battery life also varies. A 15-inch gaming laptop offers 94WHr battery life, whereas a 17-inch gaming laptop has a battery life of 91WHr. Any gaming laptop needs high buffer RAM to get a good gaming experience. Eluktronics’ gaming laptop provides 16 GB DDR4 RAM. They have a data transfer rate of 1600 Mbps to 3200 Mbps.


Conclusion

It will be interesting to see these new gaming laptops. They hold tremendous potential to disrupt the current gaming arena that wants more advancement to have a better gaming experience. High power consumption can be an issue, but gaming laptops are meant to have large heat dissipation and power withdrawal.


Source:-    Eluktronics Introduces World’s First 1440 QHD 165Hz Gaming Laptops

Silver Spoon Is the Ideal Manga to Binge if You Are a Fan of Hiromu Arakawa’s Work

 Written and illustrated by Hiromu Arakawa, Fullmetal Alchemist is a classic manga that has sold over 70 million volumes. It is one of the world’s best-selling manga of all time and continues to have a significant influence. Therefore, it is not surprising that it was an introduction for millions to the world of manga because of its worldwide popularity. Although Arakawa has had a lot of success, it is surprising that his other work, Silver Spoon, did not get as much as attention that it should. Despite being a great manga, Silver Spoon struggled and never got popular among manga fans.


The manga has over 15 volumes, and it even got an anime adaptation back in 2013. However, Silver Spoon is grounded in reality, unlike Fullmetal Alchemist, which is a tale of magic and fantasy. When the protagonist, Yugo Hachiken, fails to make it to a prestigious high school, he decides that he will enroll in Ooezo Agricultural High School. He thinks that going to a vocational school would be better for him since he would get a chance to get away from his family. Since he is compared to his successful older brother all the time, his relationship with his family is strained. However, when he arrives at the Ooezo Agricultural School, he soon realizes that his life there is not as easy as he had thought. He doesn’t really know anything about farming, and while most of his classmates have some dreams for the future, Yugo doesn’t have any.

Although, it is true that Fullmetal Alchemist and Silver Spoon are vastly different, but they do have one similarity. Both the stories are about finding your place in the world, growing and understanding one’s purpose. Just like Edward Elric was challenged to accept the death of his mother and fight for the greater good as he was destined for it. Yugo Hachiken too had to thrive in a completely different environment, find a way to fit in, and try to find out his purpose. If you are a fan of Hiromu Arakawa’s work, Silver Spoon is a must-read. It is a human story that has explored complex ideas, challenging the readers to think more about their choices. 

Arakawa is known for his talent for writing likable characters, and it is no surprise that Yugo Hachiken is a sort of character that most people can relate to. He struggles to find a purpose for himself, just like most students these days. Moreover, the other characters are also quite likable and engaging. Once the characters are introduced, one can’t help but cheer for them as they fight for their dreams. The manga is so engaging that you won’t be able to put it down until you have finished it.


Source:-    Silver Spoon Is the Ideal Manga to Binge if You Are a Fan of Hiromu Arakawa’s Work

How to Get More Activity Tokens in Spider-Man: Miles Morales

 Marvel has unleashed the successor version of their famous video game Spider-Man 2018. The newly arrived video game is known as Spider-Man: Miles Morales, and within a few days of release, it has drawn the attention of numerous gamers worldwide. Major credit for this immense success goes to the fantastic storyline of this game that features a new spiderman in NYC along with Peter Parker. The story unfolds Miles Morales, who has been bitten by a potent spider, and now Peter Parker is helping him out so that he could easily cope with the spider powers. Meanwhile, gamers are operating Miles Morales as a new spiderman, and Peter Parker has become an NCP. Aside from this, gamers have to upgrade the skills of Miles Morales, aka Spiderman, so that he can protect NYC with more ease. The best way to amplify his abilities is by using Activity Tokens that allow gamers to unlock and upgrade Spiderman skills. Thus, below we have provided a proper workaround that contains information for getting more Activity Tokens in Spider-Man: Miles Morales.


Where to Get More Activity Tokens in Spider-Man: Miles Morales

Gamers need to know that there are several ways to obtain Activity Tokens in Spider-Man: Miles Morales.

The first method is to keep playing the game through the main storyline because there are plenty of sideline and mainline quests to help the gamers obtain Tokens. However, Tokens will be rewarded according to less damage, high hit combos, and stellar performance. Thus, players should try to accomplish all these quests because there is a tremendous amount of Activity Tokens linked with them.

The second method is to play the game through an exclusive app known as the Friendly Neighborhood app. Players will start getting an additional quest through this app straight from the natives. And, players will receive a considerable amount of Activity Tokens for completing them. More importantly, players need to know that they can replay a quest using the Friendly Neighborhood app, which means they can earn inexplicable Activity Tokens from it.

The last method to obtain Activity Tokens in Spider-Man: Miles Morales is finding crimes occurring on NYC’s street. And, once they have successfully found out any illegal activity taking place, then Spiderman can take action to stop them. In return, he will receive Activity Tokens and that too in large numbers. While it is hard to witness a theft, murder, or robbery, but if it takes place, players can fetch Activity Tokens in enormous numbers.

Gamers can obtain the gaming experience of Spider-Man: Miles Morales on PS5 and PS4.


Source:-   How to Get More Activity Tokens in Spider-Man: Miles Morales

Rihanna Will Not Be A Part of Black Panther 2

 A wild rumor was going around the internet that popular singer Rihanna might not possibly join the cast of the film Black Panther, but it turns out that the rumor was false all along.

The rumor originated after certain fans noticed her name being included alongside other cast members in the Google search. Apparently, her name had appeared alongside Michael B. Jordan, Danai Gurira, and Lupita Nyong’o.

Now, according to the recent report published by E! News, the rumor had come out of somebody’s imagination, and there is absolutely no truth in it.


Black Panther 2 was expected to commence its production in March of next year in Atlanta. However, the entire script had to be rewritten because of the tragic death of the franchise’s talisman Chadwick Boseman due to his prolonged battle with colon cancer.

Now, filmmakers are planning to force themselves out of the sadness and look for other options to complete the second Black Panther film. The filmmakers were reeling with sadness for several months, but now a report has emerged which says that they have resumed all the pre-production work, and the Black Panther team is expected to hit the floors in mid-2021 (possibly in June or July).

Another interesting theory has come out of the internet pertaining to the second Black Panther film, with some YouTubers like Grace Randolph claiming that the comic studio giant is planning to use CGI to bring back Chadwick Boseman. The method will be similar to the one used by Quentin Tarantino as he brought back Bruce Lee in his last film, “Once Upon a Time in Hollywood.” Apparently, Marvel will hire a junior artist, and then they will use computer graphics to plant an image of Boseman on the man.

This will not be entirely difficult for them to achieve as they have already done a splendid job in showing a younger version of Samuel L. Jackson. Of course, we are talking about his role in the Brie Larson starrer “Captain Marvel.” Technology is not something that is beyond Marvel.

One other thing you should know is that Boseman will only be brought back for a war, which will take place in the initial moments of the second Black Panther film. Then, he will be killed off.

Afterward, we are expecting somebody like Shuri to take up the mantle of Black Panther. Her being a Black Panther is completely in accordance with the comics as she did become a Black Panther in the comics after T’Challa was put into a coma by Doctor Doom.

Of course, Chadwick Boseman’s loss is sad for all of us, but there is still plenty to look forward to in MCU.

WandaVision is the next project that we are going to see on screen. It will star Elizabeth Olsen and Paul Bettany in the leading roles. WandaVision is expected to give a premise of the upcoming Doctor Strange film titled “Doctor Strange in the Multiverse of Madness.”

While Rihanna will not be a part of the film, she has recently been seen in Los Angeles, and you can see her photos on the internet.

Black Panther is expected to have a release date in 2022.

Source:-   Rihanna Will Not Be A Part of Black Panther 2

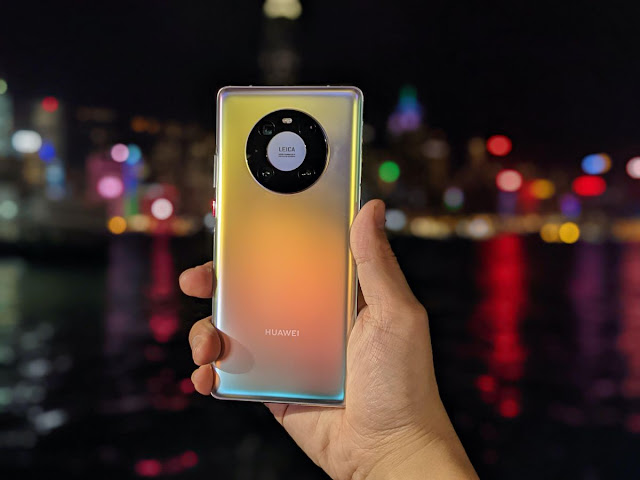
Huawei Mate 40 Pro: A Complete Review

 Huawei is one of the major players in the smartphone market. To enhance user’s mobile experience, Huawei has come up with Huawei Mate 40 Pro. Huawei’s supersonic product comes with several new features. Let’s explore the device in detail.

Physical Structure

The body of the Huawei Mate 40 Pro weighs 212 grams. There are two dimension variants of Huawei Mate 40 Pro – 162.9 x 75.5 x 9.1 mm for glass and 162.9 x 75.5 x 9.1 mm for leather. Huawei Mate 40 Pro has an OLED display. It is a glass front, glass back, or eco-leather back built with an aluminium frame. The IP (Ingress Protection) rating of the device is IP68. Hence, it is dust, dirt, and sand resistant and can withstand up to 1.5 m depth for 30 minutes.


Platform and Processor

Huawei Mate 40 Pro runs on Android 10 and EMUI 11. It provides smooth UI animations, more clock themes, improved multi-window mode, and better multi-screen collaboration. But, it does not support any Google Play Services. Huawei Mate 40 Pro has Kirin 9000 5G (5 nm) processor. This 5 nm processor technology takes a giant leap by ensuring 30% more transistors’ inculcation than Apple’s A14 Bionic chip. The processor’s execution time is 10% faster than Qualcomm Snapdragon 865 Plus. But, it will be interesting to see how it withstands against Qualcomm’s first 5 nm technology.

Memory

The internal memory of Huawei Mate 40 Pro has two variants – 256GB 8GB RAM and 512GB 8GB RAM. Also, it contains a nanochip memory slot for nano-memory cards. With UFS 3.1, Huawei Mate 40 Pro propels faster memory processing with a better read and write rate. UFS 3.1 consumes less power due to the voltage regulators used for both storage and other functions.

Battery Life & Connectivity

The battery life of the Huawei Mate 40 Pro is 97 hours. It has a non-removable Li-Po 4400 mAh battery. Huawei Mate 40 Pro supports Wi-Fi 802.11 a/b/g/n/ac/6 along with Wi-Fi Direct and hotspot facility. Apart from this, Huawei Mate 40 runs on Bluetooth 5.2 A2DP. So, it adds enhanced functionality like isochronous channels and low-energy audio. Some of the other features of communication and connectivity are:

  1. NFC
  2. Infra-red
  3. Dual-band A-GPS, GLONASS, BDS, GALILEO, QZSS, NavIC.

Sensors

  1. Face ID
  2. Fingerprint (under display, optical)
  3. Accelerometer
  4. Gyro
  5. Proximity
  6. Barometer
  7. Compass
  8. Color spectrum

Camera

Leica optics is the material used to build lenses and camera of Huawei Mate 40 Pro. On the rear side, there are three cameras available – 50 MP (f/1.9), 12 MP (f/3.4), and 20 MP (f/1.8). The 12 MP camera supports five times optical zoom. The front camera is 13 MP (f/2.4) and has a TOF 3D sensor. So, it helps to understand the depth of the water.

Audio

Huawei Mate 40 Pro comes with a stereo loudspeaker. Hence, the left and right channels of audio provide better re-creation of the sound. But, the 3.5 mm audio jack is absent. The LUFS of the device is -24.9, a notable and commendable figure to express the audio’s loudness.

Conclusion

At $ 1499.99 and $1599.99 (for different memory variants), Huawei Mate 40 Pro is available at Banggood. Huawei Mate 40 Pro comes with five color variants – Mystic Silver, White, Black, Green, and Yellow. Huawei Mate 40 Pro has significant deliverables that will attract the customers.


Source:-   Huawei Mate 40 Pro: A Complete Review

Reports Suggest That Ben Affleck is “Depressed”

 A rumor has originated from somewhere that the actor is devastated after his breakup with the actress Ana de Armas.

But will he relapse? Fans are seriously worried.

It is imperative to understand that this matter could have been blown out of proportion. However, if you really want to know, then you should know that there are some voices which are suggesting that Ben Affleck is not well.

Apparently, as reports suggest, he is not living a healthy lifestyle post his breakup with Ana de Armas. In fact, he is so devastated that he has stopped eating altogether.


A recent tabloid has suggested that the “Gone Girl” actor is starving himself and is letting his health deteriorate day by day. According to the website “Woman’s Day,” the Justice League actor is once again single and unhappy. The tabloid report has confidently stated that he is no longer in a relationship with the “Blade Runner 2049” actress Ana de Armas.

Several sources of the media houses that cover the tabloid stories have confirmed that it has been over a month since the actress has left him. However, they have added that the anguish of Affleck might push him towards a relapse.

The most horrifying part that has been revealed by the sources is that the actor has stopped eating altogether.

A recent rumor had revealed that Ana de Armas started seeing Affleck differently ever since the producers of “No Time to Die” told her that the actor is not good for the overall public image of the upcoming film and he might not be welcome at the premiere. The rumor has suggested that she had started becoming a little detached from him, which in turn resulted in him being a little too clingy for her liking. As far as Ana de Armas is concerned, only her career is her concern right now.

It is imperative to understand that several debunkers like Gossip Cop have already called this Bond premiere story completely nonsense.

However, several voices on the internet have said that his friends do think that his relationship with the actress is over as the actor isn’t talking to anyone, and he is pretty devastated right now.

You may ask right now that if Affleck doesn’t say that he is going through a breakup, then how do people know? Well, we will never know the answer, but there are some people who are confidently saying that  Affleck’s friends are indeed coming for him, and that includes his former wife, Jennifer Garner, who is also offering him a word of support.

According to the rumor, the biggest fear all the well-wishers of Ben Affleck have right now is that the actor could relapse.

However, a gossip debunking website called Gossip Cop has recently published a blog in which it has called out all of these rumors as false. They have offered some words, which they believe is the truth. The Gossip Cop has said that neither the actor is devastated nor he and Ana de Armas have broken up.

The website has also called out other nonsense stories about the actor’s personal life. Gossip Cop believes that the actor is fine and is living a completely healthy life.

Now, it is up to you which version of the story you want to believe in.


Source:-   Reports Suggest That Ben Affleck is “Depressed”

Tips for Creating an iMessage Profile on iPhone and iPad

 Have you just started using an iPhone or iPad? Just like you create a profile for WhatsApp Or Instagram, you need to create a profile for iMessage. iMessage is a messaging platform that is developed by Apple for all of its devices. Creating an iMessaging profile is an easy task that can be accomplished by any of the iOS device users. On your iMessage profile, you can set a name and a display picture of your choice. If you are a new user of iPhone, iPad, or any iOS device and don’t know the procedure for creating an iMessage profile, don’t worry. In the following article, you will get to know how you can create your iMessage profile. If you are running iOS 13 or higher versions on your iPhone or iPad, you can easily perform this task on your iPhone and iPad. Also, you can use a photo, memoji, or Animoji as your display picture.


Here, we have mentioned the complete procedure to create your iMessage profile on your iPhone or iPad. By following the methods, you will set a username and profile picture for your iMessage profile. So, all you need to do to get the way is to read this full article.

Process for Creating an iMessage Profile on an iPhone and iPad

The profile picture and display name you will set for your iMessage profile will be visible to your contacts. But, if you want, you can have complete control over your profile details. Here’s how you can create an iMessage profile on your iPhone and iPad:

  • To get started, first of all, you will have to choose a display picture and then a name for your iMessage profile. Start with the procedure by launching the Settings app on your device.
  • Now, scroll through your device screen and choose the option of “Messages” from the apps list.
  • Now, go through the option of “Share name and Photo.”
  • And after this, you will be able to view the iMessage profile setup window. Here, you will need to click on the “Choose Name and Photo” button.
  • You will then get multiple options for setting up a display picture for your Apple iMessage profile. Choose any of the options and proceed further.
  • If you want to set a photo as your iMessage profile display picture, you will have to tap on the “Photos” button.
  • In your photo gallery, you can select any image to set it as your iMessage profile picture. Tap on any picture to select it.
  • After reaching the next screen, adjust the picture’s size to set it as your display picture. And after that, go through the “Choose” button. You can also apply any filters to your profile picture. And now, select the “Done” button to proceed with the method.
  • Now, tap on the “Continue” button to set a name for your iMessage profile. You will receive a pop-up message on your screen asking you if you want to use the same picture for your Apple account.
  • On the next screen, start typing your first name in the first field and then type the second name in the second field.
  • And next, you will reach the “Share Automatically” section. Here, you will be provided with two options, including “Contacts Only” and “Always Ask.” You can select any of the options. And that’s it.

So, this is the way to create an iMessage profile on your iPhone and iPad. Try the steps now. And to receive more information, you can take a tour of our website and read more blogs.


Source:-   Tips for Creating an iMessage Profile on iPhone and iPad

Tips for Changing the Font Size in Safari on Your iPhone, iPad, and Mac

 Have you ever wished that you could just increase the size of the text while browsing any site on any web browser? Sometimes, we come across a website where we face difficulty in reading its content because of the size of its text. Of course, you can zoom in on the text to read it well. But then you will have to scroll through your device screen too much. And some websites don’t even allow you to zoom in on the text. Well, If you use any iOS device, then you can get rid of this problem. To resolve this situation, Apple added a feature to its Safari browser that enables the users to increase the font size for any website. Yes, now it’s completely possible to adjust the web text size on your iPhone and iPad.

Do you also use any iOS device? Do you also face difficulty reading the text of any website in the Safari browser on your iPhone, iPad, or Mac? Want to know about the feature of the Safari browser that allows you to adjust the web text size? If you want to explore this functionality, then, fortunately, you have arrived at the right page. Many users don’t know about this option of Safari. And for them, we have come up with this article. The following article will provide you with the methods that you can follow to increase or decrease the size of the font in Safari on your iPhone, iPad and Mac computer. So, please go through this complete post to get the technique.


Instructions to Change the Font Size in Safari on iPhone, iPad, and Mac

Apple understands the needs and interests of its users very well. And that is why it keeps on adding new features for its users. This ability to adjust the web font size provides you with more flexible accessibility, and it also provides you with a comfortable viewing experience. And with this, it has now become much easier to use the Safari browser. There are various ways to increase the web text size in Safari on your iPhone, iPad, and Mac. Here, we have explained the two easiest methods that you can follow without facing any difficulty. So, now, without delaying anymore, let’s move towards the procedure to get started.

Here’s how you can change the font size in Safari on iPhone, iPad, and Mac:

The Steps for Changing the Font Size in Safari on the iPhone and iPad

If you are using the browser on your iPhone or iPad and want to resize the web text, then you need to go through the following steps:

  • To get started with the task, first of all, you will have to start the Safari app on your device.
  • And now navigate to any website of your choice.
  • And next, go to the top left corner of the address bar that you can see at the top of your screen. And then, you will have to tap on the “AA” symbol.
  • Now, go to the larger “A” symbol that you will be able to view on the right side of your screen. You will need to keep tapping the icon until you get the text size as per your preference. You can zoom in on the text up to 300%.
  • And if you want to decrease the font size, then tap on the smaller “A” icon placed on the left side of your screen. Here, you will be able to zoom out the text up to 50%. And that’s all.

This was the first method for adjusting the web content size in Safari on your iPhone and iPad. Now, let’s see the other technique:

The Alternate Method for Changing the Font Size in Safari on iPhone and iPad

With this method, you will be able to set a fixed zoom percentage for all the websites that you will visit. Here’s how to do so:

  • First of all, navigate to the Settings app on your device.
  • And then, head to the option of “Safari.”
  • Now, scroll down and navigate to the “Settings for Websites” section and choose the “Page Zoom” option.
  • And now, on the next screen, you will see a list of the websites placed under the “Page Zoom On” section. These are the websites that you have zoomed in or zoomed out. Here, you will have to select the website for which you want to set the font size.
  • Now, move to the “Other Websites” section and then tap on any of the options including, “50%,” “100%,” “200%,” or “300%.”

And that’s it. This way, you can resize the font size in Safari on your iPhone and iPad. Now, let’s see how you can perform the same task using a Mac computer:

The Steps for Changing the Font Size in Safari on a Mac

Here’s how you can change the web font size in Safari on your Mac computer:

  • Firstly, turn on your Mac device and then launch the Safari browser on your computer.
  • Now, navigate to the Menu bar and select the option of “Preferences.”
  • And then, go through the “Advanced” tab and tick mark the box that you can see placed next to the “Accessibility” option.
  • After this, go to the “Never use a font size smaller than” option and choose the text size from the drop-down box. And that’s it.

So, by following the above-mentioned procedures, you can quickly resize the web text in Safari on your iPhone, iPad, and Mac. Try out these techniques now, and don’t forget to share the tips with your friends. And keep visiting the website to stay updated. 


Source:-   Tips for Changing the Font Size in Safari on Your iPhone, iPad, and Mac

Tips and Tricks to Uninstall an Application on Windows 10

 Out of all the installed programs and applications on your computer system, how many of them do you use regularly. We all have some applications installed on our devices that we don’t use regularly. If they are of no use, what’s the point of keeping those programs and apps on our devices. So, it’s best to uninstall such apps from our gadgets to free up some space. Although uninstalling any apps or softwares on Windows 10 computer or laptop is one of the most common and easy tasks. But, if you have just started using Windows 10 operating system, then you might not be aware of the process to do so. Windows 10 operating system provides you with various ways to uninstall any application or program from your computer system. Earlier, in the older version of Windows, removing any application was not a straightforward task.

But now, any of the Windows 10 users can easily uninstall any apps from their computer system. Are you also a Windows 10 user and want to uninstall any apps from your computer but don’t know the way? If that is the exact case, then now you don’t need to go anywhere else to search for the method. The following article will let you know how you can remove any apps from your Windows 10 computer system. So, to get the techniques, please go through the complete article.


The Process for Uninstalling Apps on Windows 10

There can be several reasons why you want to uninstall an application from your computer system. But the Windows 10 operating system offers you the most simple and easiest ways through which you can remove any apps and programs from your computer. And here, we have mentioned three different and convenient methods for this purpose. So, if you have installed an app on your Windows 10 computer or laptop that you don’t need anymore, here’s how you can remove such apps:

Also, you need to note that you cannot uninstall the built-in apps using these methods. For that, you can use tools like Windows Powershell. You can check out the related articles by visiting our website. Now, let’s have a look at the below-mentioned procedures:

The Steps for Uninstalling an Application through the Start Menu

This is the easiest method for performing this task. Here’s how you can uninstall an application using the Start menu:

  • According to this method, first of all, you will have to navigate to the Start button.
  • After clicking on the Start button, now search for the app that you want to uninstall. And after you find the app, right-click on its icon and then select the option of “Uninstall.”
  • Now, a dialogue box will appear on your screen with a message stating, “This app and its related info will be removed from your system.” Here, you will have to click on the “Uninstall” button. And that’s it.

Using the Control Panel Tool to Uninstall any App

Here comes another quick and straightforward method for removing any app from Windows 10 computers. Here’s how to uninstall any app using the Control Panel tool on Windows 10:

  • To remove any app on Windows 10 according to this method, firstly, go to the Start Menu and then click on the search box and type “Control.”
  • And after this, you will need to click on the “Control Panel” icon.
  • Now, under the “Programs” section, select the option of “Uninstall a Program.”
  • And then, you will be able to see a “Program and Features” window appearing on your screen. And here, you can see a long list of the installed applications. If you want, you can also sort the applications by name, publisher, date of installation, and size. Now, locate the app that you want to uninstall and then right-click on it. At last, select the option of “Uninstall.”

The Steps for Uninstalling an App Using the System’s Settings

This is another technique that you can try for uninstalling any apps on your Windows 10 computer. Here’s how this method works:

  • First of all, you will have to open the Settings on your computer system. You can do so by clicking on the Start menu and then click on the “Settings” icon. Alternatively, for launching Settings, you can also use a keyboard shortcut that is “Windows + I.”
  • After reaching the Settings section, you will need to click on the “Apps” option. You will now be provided with a list of the apps that you have installed on your computer system.
  • Locate the program that you are going to uninstall and then click on it.
  • At last, click on the “Uninstall” button to start the uninstallation process. And that’s all.

So, this way, any of the Windows 10 users can uninstall any apps and programs on their computer system. You can also try any of these procedures. And that’s all for now. Please stay tuned with us to keep getting daily updates.


Source:-   Tips and Tricks to Uninstall an Application on Windows 10

How to Fix AirPods not Connecting to Mac Issue?

  Mostly, AirPods work perfectly with iPhones and iPads. It seems like these truly wireless earphones were designed mainly to work with iPho...